WEBSITE SHIFTED!!!!

hey y’all. remember my post so long ago about me getting a domain?


well, i forgot to mention, this site is now moved!!!

check out: http://www.aaishamuhammad.co.za

I’ll still use my profile and be active with the blogs i follow and this blog is staying. But no new content.

WEBSITE BEING TRANSFERED.

Hey everyone. i know i am somewhat inactive on this blog, but, i have now got a new domain and am setting up my website there. the blog will also be transferred, and i will update you guys shortly.

but what im tryna say is that i will be EVEN more inactive. (if i wasn’t inactive enough 😀 )

This site will always be on, never off. I will continue using WordPress for my reader.

Curbs or snaffles? Or both?

A bit post? Yet again? Okay, to be very honest, I was supposed to be writing two more posts, Meet Diesal(It’s an introduction to Diesal with a funny twist to it, as the previous intro was very short.) and Backyard Breeding(it’s all about backyard breeding, and I just gave a sneak peak to them both) but I conveniently got the writers block and forgot what I wanted to mention. And I got this quick idea so I decided to write about it. I will be writing the other two as soon as I can remember.


To begin with, I’d like to clear a confusion between snaffles and curbs. Some people think that a snaffle is a bit with a jointed mouthpiece. Well, that’s nowhere near the case. A snaffle can have a single mouth, a jointed mouth or a double-jointed mouth. Maybe we must cover the anatomy of a bit first?


three-p snaffle

A three-piece/double-jointed snaffle. This bit consists of two main parts: a) the two rings that are right next to the horses mouth, called the bit rings and b) the three portions attached to the bit rings, called the mouthpiece(mouth is the short of it, and I will often refer to it as the mouth throughout.)

The bit in the above picture is a snaffle bit. The reins and the cheekpiece both attach to the bit rings. The snaffle is any bit with no leverage, no matter the mouth.


curb-bit

A swivel curb bit, with snaffle rings. Note the long rods on either side of the mouth. Those are the shanks. The lower ring is where the rein attaches for curb action and the above ring is where the cheekpiece and curb strap/chain attaches. To use this bit as a snaffle, the reins must attach to the snaffle rings next to the mouth, in which case it will act as a drop mouth snaffle with poll pressure.(I’m not going into details about those yet until I can clear myself abouth them.)

A curb is any bit with leverage. Think about what will happen when you pull on the reins with the above bit.(You must imagine the reins to be in the curb ring, not the snaffle one.) As you pull them, wouldn’t the bit bend upwards in the horses’ mouth and pull down on the cheekpiece? Obviously. That’s what the curb does. The length of the shanks and whether they’re swept backward(like the above bit) or not all affects where and how the bit applies pressure, but since I’m not very sure about what does what myself I won’t mention anything about that for now. If you’re unfamiliar with the curb strap/chain, it’s a strap or chain that goes from the above ring to the other one, so when the reins are pulled, it twists and applies pressure to the sensitive area just behind the horses’ chin. It’s commonly used with most curbs and it’s purpose is to gain better control when slowing a horse.

So, a snaffle is a bit with ZERO leverage and any sort of bit that has leverage is a curb. The gag bit is also a curb, even though it doesn’t have any shanks. The reason it’s a curb is because when the gag reins are pulled, the bit twists onto the tongue and then moves up in the horses’ mouth because the reins go through holes in the middle of the ring and join to the crownpiece of the bridle.

Okay, so I’ve (hopefully) cleared any confusion (if any) about snaffle bits. So now we’re going to move on about which bit to use. Many people say that the curb is a ‘nasty’ bit and the snaffle is a ‘good’ bit; however, that is not true.

The bit is equipment, and therefore, like all equipment, one cannot say it is good or bad. It is in the hands of the user whether he chooses to make that equipment good or bad.

You’ve probably heard that piece of text from me in previous posts as well and I sometimes even say that on social media when there is a fight on harsh bits. I agree, sometimes, the way a specific bit is built or its mechanism can be painful to the horse regardless of the rider’s hands, but you can’t judge the majority of bits just because it looks cruel. Under good hands, the worst of worst curbs can be very good.

I read this on some site:

What is the entire difference between a curb and a snaffle? One has leverage and the other, not. In harshness, a light rein can transform the curb into the gentlest bit and a harsh one can make the very snaffle titled ‘The horses’ mouths’ best friend’ into ‘the horse’s mouth’s worst nightmare’.

I like that saying because, all in all, it is very true. It all boils down to how one uses the piece of equipment. A gun, for example, is an item otherwise used for general self-defense or for sports. Anything harmful with that? No. But one can use that very gun that he claims is for self-defence to kill an innocent human. Is that not true? Obviously, it is up to the hand behind the trigger to decide what he uses the item for; good or bad. Because it has the ability to be used for bad reasons, does that make a gun bad? At least, I don’t think so. The same goes for bits. Think about the curb bit as a gun; most of them have a bad reputation for being ABLE to do harm. But with a good hand, it’s just like a gun being used for self-defense! No harm caused! Now think of a snaffle as a gun; most of them have a good reputation so imagine them as a small pistol used for sports. Can one not shoot someone with that too? Obviously, they can. Once again, if you’ve got a good hand, then it’s a normal sports gun, but with a hard hand, that very same ‘sports gun'(snaffle bit) can be used to ‘murder'(be bad to the horse’s mouth).

Here you go. A curb is not a bad bit and snaffle is not a good bit. So now, what bit should you use? It all depends on what you need and what you horse needs. Try being gentler to their mouth. Now, that is a lot easier to say than to do. I will not go in detail into bitting. Bitting is best left to someone who knows the horse, the mechanics of the bit, who will ride and how, everything. In basic terms, an expert. Not top-of-the-class rider, horseman, champion, three times gold medalist, blah-blah, not that stuff. Just someone who knows that job. But you, as a user, should know everything ’bout that bit and why you’re choosing it. A person like me cannot sit miles away from you and your horse and tell you to use that bit and not this. Even, depending on the horses behaviour, choosing between a loose ring snaffle and and eggbut cannot be decided from over the web with no details. So if you are looking for a good bit, I’d say do some research on possible options that you think from a brief description would suit your horse, ask others, and then try different bits. Just do what you think. I’ll leave it of here.


I don’t know whether the examples chosen are good ones :\

But atleast I posted, and now until my writers’ block is over, just wait patiently for my next two posts.

P.S. I might be shifting my stories over to my blog. Stay tuned! 🙂

Bad Riding + more…

This post is more of a multiple purpose post. While the main topic is bad riding/riders, I will be discussing bad equipment, better/worse equipment and overall a few more topics, as they come into my mind.

I’m not going to mention any peoples names. They’re just going to go as anonymous. To begin with is rollkur. For those of you who are not familiar with rollkur, it’s very common in dressage, more like the main thing in dressage.


rollkur

A horse in extreme rollkur. Note the extremely tight reins, and the horse is gaping to try and relax the extreme pain. You can almost see the pain in his eyes.

The other name for rollkur is hyperflexion. It is not uncommon for the horse to foam excessively at the mouth when ridden under rollkur. That is because it is extremely unnatural for horses to hold their head and neck in such a position. Many horses tongues have been witnessed going blue and dangling out of their mouth due to lack of blood supply. Why? Because the rider is pulling the reins too hard. That is the only way one hold the horses head like that. Refer to the above image, and see how tight the reins are. Remember, the horses’ tongue is always under the bit. To pull a horses’ head down with the bit that is over his tongue, and to hold it there, applies so much pressure on the tongue to cut the blood supply to the tongue.


blue-tongue

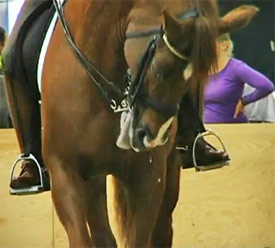
Note the horses’ tongue is blue and limply hangs out of his mouth. However, the contact seems light to his mouth in the picture. But the horse is in extreme rollkur, and that is proof that his tongue was blue due to the pressure.

FACT:
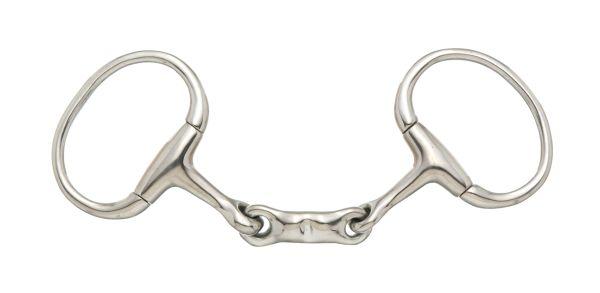
A horse tongue cannot go blue with a two piece mouthpiece. Why? Because to get the rollkur, normally pulling your reins back will not get the desired result. Sure, the horse will pull his head back, but not down, as in rollkur. To get rollkur, you push the reins down, to their shoulder, and then pull back and down. That’s what will get the horses neck in that ‘desired’ position. To hold it, you’ll have to pull the reins upwards, though. Now, under normal conditions, if you pulled back, the jointed mouthpiece will become like this: >, with the point to the outside of his mouth. That will cause it to pinch the mouths’ side, therefore it has a ‘nutcracker’ effect. But back to getting it to rollkur, the bit will become something like this: ^, with the point hitting the horse on the roof of his mouth. Obviously, it hurts, but the tongue has no direct pressure on it, therefore it can’t turn blue. Please note that the < and ^ symbols don’t represent what the bit will look like in reality; it is just the closest symbol to enter for now.


two-p snaffle

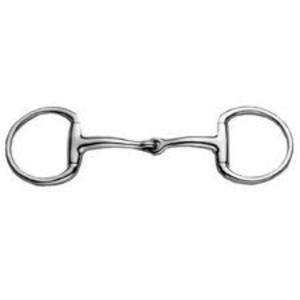
A two-piece snaffle, for you to get an idea of the nutcracker effect and how the tongue has no direct pressure.

A two piece is also alternatively called the single jointed mouthpiece.

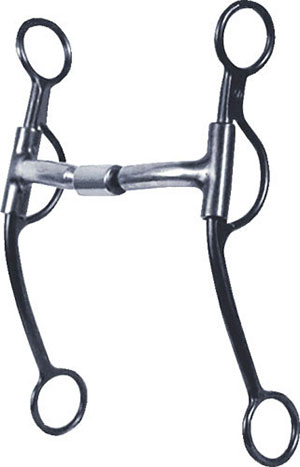
Another thing, three-piece or double jointed bits have very little nutcracker effect if any at all. While the image attached below shows the bit as crooked, which would mean a nutcracker effect, it does not happen in the horses’ mouth, unless the bit is so long it the joint takes almost the entire of the horse mouth, which is obviously impossible. If you pull it to get rollkur even, the centre joint lifts off of its tongue, which has a very little nutcracker effect, but it can’t become a point, unlike the two piece because the centre joint holds the two main pieces. That applies the pressure on the bars, as it should. It keeps the sensitive tongue from getting the pressure. Note that under normal circumstances(that is, not asking for rollkur) the bit will have slight nutcracker if pulled on hard.

three-p snaffle

A three-piece snaffle bit. You can get an idea of how the centre piece does not let the bit become a point.

Now, DO NOT think I’m targeting dressage for the bad riding part. Next, I’d like to discuss cross country. Sure, XC may seem more natural for the horse, instead of jumping upright fences in SJ(Show Jumping), they’re jumping logs in a seemingly natural setting, it can be harder on the horse. Firstly, most cross country jumps nowadays are bigger than the horse itself. If not, they’re kinda tough for the horse. Sure, if they’re small, go for it! What I’m targeting here are the high/big jumps.

It stresses the horses’ fetlocks for landing from such high fences, and while it may remain true that if the jump is wider it reduces the landing force, it still doesn’t omit it completely. The chances of serious injury are higher in XC, because if the horse has a tiny miscalculation, and either jumped too early, too late or knocked the jump, the jump does not move. That can easily cause the horse to flip over, break his neck, feet, anything and it can be fatal for the rider as well, as opposed to SJ where the jump will fall if the horse knocks it. To sum it all up, that’s not natural for the horse. If the sizes are small, then you’re well off.

Now, for some more topics.

Firstly is the common ‘misconception’ that the bit can affect how the rider communicates to the horse, and while that is somewhat true, it really is the rider who controls how he communicates with the horse. For example, some curbs have quite a bad reputation for having lots of leverage, while in fact with a very soft hand, they’re quite as good as a snaffle. And some snaffles have an incredibly good reputation for being very soft to the horses’ mouth, while a hard and rough hand can cause as much damage as the above-mentioned curb bits. So what I’m trying to get at is that if the rider uses the bit properly then the ‘worst’ can be the best and the ‘best’ can be the worse. Remember, the bit is an aid; an aid to the riders’ hands. If used properly, they’re great, but otherwise, they’re simply the worst. Take, for example, a car. A car is a tool. You can use the same tool to do bad things and good things alike. The same with a bit of any sort. You can use gently and be good to the horse’s mouth or use it roughly and be bad to it. (The reason misconception is in inverted commas is because it usually is pretty obvious that the bit is a tool. Many people genuinely believe that the bit affects the communication, those people are educated the wrong way. And if the trainer who told him/her that claimed he/she was fully qualified, I would never believe that person.)

Secondly is the use of spurs. For those of my readers who are unfamiliar with spurs, they’re an extension of the leg of the rider, more frequently called a leg aid, as they are an aid to one’s leg. Whether you decide to call it a leg aid, a leg extension or anything else, a brief description of most types of spurs would be a metal thing that drives deep into the tummy of the poor horse when the weak little rider kicks or squeezes. However, a few types of spurs don’t fit into that description, such as bumper spurs and ball spurs. Some people believe that English spurs are gentler and Western spurs hurt the horse a lot more. However, in simple terms, English or Western doesn’t make a difference in spurs. Some types of Western spurs are not that harsh and some English are terribly harsh. The basic idea is that discipline does not matter for spurs. Ball or roller spurs are used in Western and English and not particularly bad, and so are bumper spurs, even though both are more commonly seen in English. But why have I put using spurs in this post? Because of the ones with lots of spikes. Most of those ones even have blades. Those are the bad types. But as I mentioned with bits too, spurs are just an aid. The way one uses the spurs can change how the spur behaves. If you ram a bumper spur repeatedly into the horse, they’ll hurt him also, even if otherwise they’re ‘gentle’.


Okay, that’s it for this post. I know it is quite a long read, but I’m pretty sure it’s not boring. By now, you’re probably boiling with rage against me and disagreeing with me, or else you’re very enthusiastic and agreeing with me. Whatever the case is, comment your thoughts below. See ya next time, I’ve got two more posts in pipeline already 🙂


P.S. How do you like my blogs’ new theme?


Using a choke chain

Choke chains on dogs. An issue that is disputed upon endlessly. The thing that drives me crazy is the extremism. On both parties of this issue. Both of them are extremists. People – by the way, I’m not talking about anyone in particular – don’t seem to think the way they should. Mutual agreements, come on people, they exist!
Okay, I do not need to waste my post in this. There are the people who come to mutual agreements, just the majority doesn’t.

So, we’re just going to dive right into today’s post, the choke chain. What its original use was, some alternative uses to choke chains, their pros and cons, and some more topics.
What really is a choke chain? Trust me, not all types are as bad as they sound, provided they’re used correctly. Some types have got metal spikes sticking to the inside. When you pull it, so it tightens, obviously, they dig right into the poor dogs’ neck.

Quickly, let’s pause on the types of chains and discuss one common confusion. A choke collar would typically refer to a simple choke chain, which is with no spikes. A prong collar would refer to the spiky one. Any type of the choke collars can be used with a simple leash or chain. When used with a chain, they’re referred to as choke chains and choke collars otherwise. A half choke or half choke collar is a simple leather(or any other material) collar, where half of it is a retracting chain. In normal conditions, the collar is full and loose, but when you pull it, the chain draws the collar tighter. However, it will never go as tight as any of the other mentioned chains. The confusion is the term choke chain or choke collar can also refer to all of the above-mentioned collars, including the half choke.


Half-check-dog-collar

A classic half choke collar.

The half choke can fairly be the best collar for adult strong, heavy dogs. Our rottweiler adult also wears a half choke. In addition, it can go fairly well with strong, but not big, heavy breeds. Our Basset, Boo, went well in a half choke. For slightly stubborn breeds, it’s a good one for young ones still undergoing training, but it’s best to look at either a harness or a gentler collar for even younger ones.

In addition to the classic, single chain choke collar, they are multi chain and chain half chokes as well as prong half chokes. And that justs names a few. We left out the multi-chain half choke as well. However, regardless of what choke collar you use, TAKE PRECAUTION. NEVER leave it on the dog unattended; the dog can easily get it caught somewhere and can choke on it. Some people leave the chain on because they believe it won’t choke the dog, well, that can more easily kill a dog. Even if the dog just steps on it, it will choke him.

The main, or original purpose of the chain was to better control your dog. However, force isn’t the way to go about controlling your dog. At least, not the best way. Let’s use the following examples.
You’re walking your dog, on a soft half-choke collar. He starts to pull away from you. The collar draws tighter but is limited and then resorts to just plain applying pull-pressure.
You’re walking your dog, on a full choke chain. He starts to pull away from you. The collar keeps on drawing tighter, practically choking him. If he doesn’t return, it can kill him.
Which do you think the dog would better respond to? Obviously the latter. So that is the original purpose of the choke chain/collar.

Now, for the alternative uses. Use the chain as a reinforcement. Our rottie is untrained. We never trained him, due to other reasons. For a while, he would never respond to his half choke. I had no other option than to use the chain. Fast forward two weeks, using the chain twice a week for barely ten minutes, I didn’t need to use it. For the first week, I used it only. No collar. Then the second week, I clipped the chain to both the collar and the chain. The result was, it didn’t tighten more than the collar would allow it to. However, since he is used to obeying the chain collar, he obeyed. That teaches them to respect the half choke too. Then, I removed the chain totally. Now, a week after, he is beginning to ignore the collar again. So now, yet another way to reinforce. I clipped a normal leash onto his half choke, and then wore him the chain. It just hangs there, on a loosely dangling chain. If I want him to turn, or go, or stop, I first pull only the leash, which is attached to the collar. If he doesn’t respond, I tug the chain.

So, I’m going to finish this off now. For more animal training, behaviour and other issues, visit my Wattpad book, Training Animals.


Wish list for Minecraft

Minecraft 1.10 has just released. And they got a whole bunch of cool things with. I personally haven’t had a chance to play it yet, but whenever I do, I will probably review it. So then we’ll cover a lot more of the features of that.

But for now, I would love it if these features could be added in. I’m not sure if some of them have been added to 1.10, I’ll only discover with time.

  1. Birds. You know, in Mo’ creatures mod, there are so many different variations of birds. You can even tame them, and make them ride your head. Wouldn’t that be cool? I know many don’t like the idea of implementing things from mods into vanilla, but lots of birds flying around and chirping; I doubt anyone could resist that.
  2. Fish as entities. Right now, a fish is a plain object, that you acquire when ‘fishing’. But what exactly are you doing when you fish? Retrieving any plain old object from the water, like how you can also get junk and loot. But if there were real entities, such as for example salmon. They would drop like ‘salmon’ objects, and then there is your entity. They can escape your rod if you hook it up too fast etc..

SPOILER BELOW!!

  1. Biome-specific mobs. Like in 1.10 *SPOILER!!!!!!!!!!!!!!!!!!!!!!!* you get polar bears in the colder biomes. And some different zombie in the desert. And then if for every biome, you had some specialty mobs.
  2. More biomes. Right now, there are a couple of biomes, and what if you had really cool different biomes? Each with new special mobs.
  3. Snakes. Another idea from good ol’ Mo’ Creatures. Different sorts of snakes, that you should be able to tame. That would be cool. Cobras, mambas, rattlers, vipers, pythons, etc… that will be biome specific. And they will also be neutral and hostile ones, so you will have to be a world-class dodger.
  4. More mobs. A lot of more mobs, hostile, neutral, and passive. Rats and mice, to destroy your farms, then keep cats to keep ’em off, things like that. 
  5. Lots of cool more features 😀


Okay, bye for now! See ya later.


Dogs vs. Cats: How they drink

We all need this clear liquid that this earth is full off. The Earth is called the blue planet because it is full of water. Every living creature in this planet, be it plants, animals, or us, need water to survive. And they have each got different ways of consuming it. Plants absorb it through the ground. And all animals that drink it have got fascinating ways they do it.

Today, we’re going to be seeing the major difference between how dogs and cats drink. The first thing, the common misconception that they both drink the same way. Well, that is false. They both have different ways, and while they both may use their tongues to drink, they both have individual drinking methods. A ladle is a nice way of understanding how dogs drink. When you dip a ladle into some soup, for example, their is soup inside the ladle, and then as you draw it out of the soup, it is dripping, and there is that like trail of soup flying off of it.

That is somewhat similar to how dogs use their tongues when it comes to drinking water. Or anything for that matter. They can also get their tongues into very narrow spaces and pull water out. And this is how dogs do it.

They first carve their tongue into a scoop, like a ladle, and then smack it roughly onto the surface of the water. Then they lower it into the water, filling their ‘ladle’ with water. Then quickly, they draw the water filled ladle into the back of their mouth, and then close their mouth on the flying water from their tongues. That is what makes the water fly, making a dog drinking water a pretty messy sight.

Cats, on the other hand, don’t drink nearly as messily. If you own both cats and dogs, like me, you’re probably a witness to the fact that cats DON’T splash half of the water they intake all over the place. But also, they take a lot less water in in one sip, or lap. We won’t use the ladle example here, though maybe the soup flying off bit could be used. Imagine a J, and curve the lower point BACKWARDS instead. And lengthen it. What do you get? τ. A more curved version of that symbol. Perhaps they should implement a ‘cat tongue’ special symbol in English. Maybe, actually, it isn’t a more curved version. A cat’s tongue is basically that symbol, providing you remove the – at the top. Anyway, back to business.
The cat then lowers the tongue a lot more gentler – if it’s the correct term – on to the surface, and then they pull it with a lot of speed into the back of their mouth, closing it on the trail flying. They do it so quickly, and that is how they get almost all of the flying trail.
P.S. THIS IS WHAT I’VE LEARNT ON MY OWN. IF IT IS INCORRECT, PLEASE LET ME KNOW.

Time for some fun, now. What would happen if humans lapped things like dogs or cats? They would be able to clean glasses with the remains of some thick drink on it. Lick it up(eww.) and then dump it for washing. Okay, seriously, eww. That is so gross. So bye bye! :’)

Minecraft 1.9: The Rainbow Beacon


I wonder whether anyone has had a look at my Minecraft 1.9 review. I believe nobody. In any case, here is my gaming experience in 1.9 pre-release snapshot versions.

To begin with, my ‘Rainbow Beacon’. It was not a too complex thing, and was made in 1.9 snapshot versions. If you want to know how i made it, read on.


I was messing around in creative, and having no exact intention on what to do, other than the fact I wanted to build something. By good luck, I had JUST seen a video of the Rainbow Beacon in MCSM*. In case you were wondering, Lukas and the Ocelots had built it. Though mine was nothing nearly as complex as theirs, I decided to manually make(not much Redstone involved) the beacon.
So I set up the base and the usual beacon. Now, time for the real fun!! I built up sticky pistons** and set a lever next to every-single-one. Don’t be intimidated, not that tedious. and it seems like I haven’t mentioned the real part, I put stained glass in front of each sticky piston, which was set far enough that the glass would be in the beacon light. And… the all grand Rainbow Beacon! Yes, you had to manually flip every lever for each color, but after all, it was fun. If you haven’t seen Lukas and the  Ocelots build, you might be wondering what they had made. It was a Rainbow Beacon, but made with lots of redstone involved, and each color was swapped automatically behind the scenes. Behind a barrier, that is. The view-able-by-public result was a dazzling light swiftly changing colors. Nice, huh? Mine wasn’t nearly as sophisticated, seeing that you must do everything manual and stick a row of sticky pistons randomly. After all, I wasn’t in a building competition!

How to build it:

I’m not going in to details on how to set up the beacon part, to be honest, I can’t exactly remember how I did it. However, they are plenty of tutorials around the web for that, so you just need to have a browse around and I’m sure you’ll find some pretty interesting stuff.
All what I’m telling you is how I built the rainbow part. If you’d like to make a sophisticated version, then I think YouTube is your best friend. I’m not too of a crafty builder, and am not Olivia or Ellegaard. In simpler words, not a redstone engineer.
Any way, to get started, set up your beacon as usual. Then, set up floating, or none floating, if that is what you like. I did floating. Okay, floating or non-floating cobblestone or any other block of your choice two blocks away from the beacon light, not the base of it. I chose seven floating blocks, but you can put as many as you like, it depends on how many colors you want if floating, and how tall or where you want them as well as how many colors in non-floating blocks. After your blocks(I’ll say cobblestone, as that’s what I used. nothing fancy) place the sticky-pistons, how many you want. Because I wanted seven colors and I had put seven cobble, I put the pistons right up. However, the position and number is totally up to you. For convenience purposes, because I was in creative and it takes you simply forever to find something in your mega-huge inventory, I had dished up all the things needed into my Survival Inventory and put as much as possible in my hotbars. Anyhow, now just stick all your stained glass into your pistons.
Last step before your RB is fully functional! This is the simplest part, simply put a lever on the side of your piston or on the cobble(not sure if it will work that way, never tried it) and bam! you can now flick each lever and the color will change.


So basically that’s all I have in store today, and I’ve been writing this for two weeks now. I’m finally publishing it.
Maybe I’ll later write on my survival experience. MAYBE.

*Minecraft: Story Mode.
** Do not use normal pistons, only sticky pistons. This is necessary as a normal piston cannot pull and you need to pull your glass back obviously. Normal pistons will leave your glass always in the beacon.

Gaming Weekly #3: Minecraft 1.9 Review

The Minecraftian world had been buzzing over December, when IS 1.9 going to get released?! To add to that, Telltale Games ‘Minecraft: Story Mode’ Episode 5 was hovering, too. Telltale hinted to the episode in exciting ways, and nobody could wait. Anyways, we’re here for the 1.9 factor.

I played it on the weekend immediately after release. I personally think it’s awesome, it adds lots of new things to your general Minecraft survival, and makes me a lot more paranoid at night. Their a couple of features that I want to cover, and I might do a post on my gaming experience in 1.9 and snapshot versions later on. For now, let’s pipe right into some of the key features I’d like to cover:

  1. Mobs have more health points.
    Mobs now have more health points, and that means fighting them takes longer. To add to that, the cool-down in attacks makes you want to be strategic with your attacks.
  2. An attack cool-down has been added.
    That, has added lots of flavor(how ’bout taste?) to your survival world. AND, it has lit the fire of rage in all PVP(Player vs. Player) spam clicking fans, because spam clicking no more is effective. Spam clicking = forever for mob to die. That being said, you can still spam click if you please to do so. However, the attack strength for your strike is VERY low. If you wait for the cool down, then lo and behold! your attack strength is full up again! How ever, the cool-down is very little, not something that will kill you if you struck in the wrong place and must wait for the cool-down. This means you must strategize your attacks, head-hits, crits, etc…
  3. The swipe attack.
    This is a VERY useful attack method. You literally swipe your sword across your enemy. Or prey, whatever, your victim. While doing this attack, it is possible to swipe across multiple victims standing together, like I struck two cows together. With two continuous swipes on two mobs, who will not run away like prey or anything, you have a high probability to kill them both together. That is one nice move. The default key for swipe in Windows (PC) is Shift. Holding the Shift key while striking will result in a swipe.
  4. Your second hand.
    I appreciate this feature Mojang decided to add, you can now use both of your hands. This is a great feature, it enables you to keep your sword ready while mining to flick off mobs, or hold a torch handy to keep plugging it in while exploring a dark cave. We all know that it is a great blessing to be able to ALWAYS hold a sword and do something else, simultaneously. It keeps you safer for one. To add something (hold) in your second hand(there is a slot in your hotbar for it), the shortcut in Windows(PC) by default is F5. Scroll in your hotbar to the item you want in your SECOND hand, then press F5. And.. It’s in your second hand. If the item you want is not in your hotbar, just open your Inventory, and you will see a slot(next to your ‘image’) with a sort of shield made inside it. Drop the item in side it, and it’ll be in your second hand.
    BTW, how to choose which hand to use? For example, you have a torch in your right,and sword in your left, you click, it check whether the second item has any left click feature, if no, well it strikes with your sword. If you right click, it will place your torch(remember, you can no longer block with your sword).
    You can also toggle which is your main hand from the settings.
  5. lots more.
    They’re many more features I’m not reviewing now, but you can go to some sites where there is a complete list of new features + items. You can go check ’em out.

With that, I just wanna add that I really like the 1.9 update. See you next time!

PICTURE ISN’T MINE. It’s licenced Creative Commons for Reuse.

Horses Weekly #6: Tips on improving your straightness

Straightness is one very important thing in riding. You must come to a jump straight, and keep your horse straight, even if you aren’t necessarily jumping. If you come in skew, your horse will likely duck out, or if it does jump it, it’ll be quite odd.

Now, coming in to a jump straight makes sense, you come straight to the middle of the jump. If the jump isn’t straight itself, but rather set sort of diagonally, that doesn’t give YOU any reason to come skew. You’ll come right down, aimed for the center. Say, for example, you’re riding in a rectangular arena, and there’s this jump in the center of the arena you have to do. However, it points right at one corner.That gives you no reason to come in skew, by coming rather from side instead of the corner. You’ll head to your jump either from the corner or a little later on, but you’ll look right ahead, coming straight down from the corner, over the middle and straightly, not skew.

Below are some tips for improving your straightness, from my experience after that one lesson where we did nothing but working on straightness, jumping straight, and riding straight.

  1. Ride between two object to keep you straight before jumps.
    Place two cones, or poles, before the jump, in line with it. Ask your friend to, or do it yourself. Place them in such a way so you come in from the side, for example, and go right into those two things, in between. Come right into the middle of the two, and stay there. Remember, the middle of those has to be the middle of the jump. That helps you keep yourself straight, and you’ll come into the jump straight.
  2. Look, look, look.
    Look for your jump. Look for you straightness, and plan in your mind where to turn. This has been quite effective for me to be straight. When you’re heading to the jump, look. Look at it, look for when to turn if you need to turn, where, so that you are in line with the jump. And don’t fidget with your reins. Keep them even and guide the horse straight.
  3. Practice by trotting over small poles.
    Lay out some very narrow poles on the ground, so you can only go over them by going in a very straight line. Trot over them, and practice over them. It really improves your straightness, or did mine, anyway. At first, Wakker would trot over to the side, and I’d miss a few, or all. Gradually though, I was able to trot at least half of them. And finally at the end, I was able to keep him straight right through.

And that is all the tips I have. I hope theses work for you, and if they don’t, don’t hesitate to ask your instructor for tips! These just work for me, they may not necessarily work for you. Google up some tips and find other ways that work for you!


Till next post then! Bye!


PLEASE NOTE: During the December holiday season, my posting may decrease. Don’t worry, though, I’ll try and keep a post per week coming! I’ll try to post more next year.

ALSO: excuse the mobile and tablet version’s of the featured pic….